Microsite Cheat Sheet
For those people working with the microsites, e.g., those sites cloned using microsite-template, here is a cheat sheet for working with them. See also the instructions in README-template.md in the microsite-template repo for more details.
Table of contents
References
First, here are some useful reference links and other notes:
- The
microsite-template, which is cloned to create microsites: github.com/The-AI-Alliance/microsite-template- The instructions for using the template: README-template.md
- The “pretty” website for our GitHub organization: the-ai-alliance.github.io/
- (You are now reading a page on that site
 )
) - The content is identical to the Alliance GitHub organization’s
READMEpage: github.com/The-AI-Alliance/. - The list of repositories (“repos”).
- (You are now reading a page on that site
Need a Text Editor for Your Mac?
Unfortunately, there is one step you have to do on your laptop as part of cloning and using the template. You don’t need a text editor suitable for source code, but it might come in handy. You can install Visual Studio Code, an “IDE” (Integrated Developer Environment) that is very popular with developers, but it can be more than you need.
This website lists some free text editors you might install. Of the ones listed, Dean has either tried the following ones or they look like decent, easy-to-use options:
- MarkText, Pine, MacDown, Markdownify, and Zettlir: Limited to Markdown, the simple alternative “markup language” that is translated to HTML and easier to write than HTML, although not as full-featured as HTML. You can use either language in your sites. Since our microsites mostly use Markdown, with occasional use of HTML, one of these editors may be all you need.
- TextMate: Full featured; not limited to Markdown. This was once Dean’s primary editor. Lightweight and easy to use.
- SubEthaEdit: Full-featured; not limited to Markdown. Dean used this one several years ago.
The editors with vim or emacs in their names will have a bigger learning curve, although they are very capable.
Using the Microsite Template
To create a new website, open the microsite-template repo. On the upper right-hand side, click the green menu button, Use this template, then select Create a new repository.
- Leave Include all branches unchecked.
- Pick the The-AI-Alliance GitHub organization. (It might default to your personal account…)
- Provide a unique repository name.
- Provide a description (recommended, but optional).
- Select Public or Private. Most sites should be public, but you may wish to edit the content before making it public. (Note that the more detailed instructions in the
microsite-templaterepo for publishing the website won’t work until the repo is public.) - Click Create repository.
The rest of the following instructions complement the microsite-template’s README-instructions.md for finishing the process of setting up the microsite.
Next, clone the site locally.
- Open the Terminal app.
- Enter the following commands at the terminal prompt. Replace
my-sitewith your chosen repository name in the following:
git clone git@github.com:The-AI-Alliance/my-site.git
cd my-site
Finish the initial edits by running a “shell” script, ./finish-microsite.sh, that substitutes placeholders for desired string values.
- Run
./finish-microsite.sh --helpto see the available options. - At a minimum, you’ll need to decide on the human-readable title/name for your site.
Run this command, changing the title as appropriate:
./finish-microsite.sh --microsite-title 'My Amazing Microsite'
See the additional instructions in README-instructions.md about files you’ll need to edit, pushing the changes upstream to GitHub, and changing some settings to publish your site. After that, you’ll be able to do all edits to the site in the GitHub UI.
The rest of this cheat sheet will focus on editing tips for the pages, including using the GitHub UI.
Editing GitHub Pages Content
Mostly, we use the GitHub Pages flavor of Markdown. If you need to use more advanced Jekyll constructs, see this reference. Consider bookmarking these links for future reference!
This flavor is actually slightly different than the Markdown flavor used for git repo READMEs and other Markdown files, which can be confusing. (For a reference for that Markdown flavor, see here.) Fortunately, they are mostly the same…
The following content is structured as a tutorial.
Open the Markdown Practice Repo
I created a markdown-practice repo that we can all use to practice editing pages. This is a private repo, meaning only team members of our GitHub organization can see it. The website is also not published.
Click this link to open the docs folder where the website content lives.
Create a New Markdown File to Edit
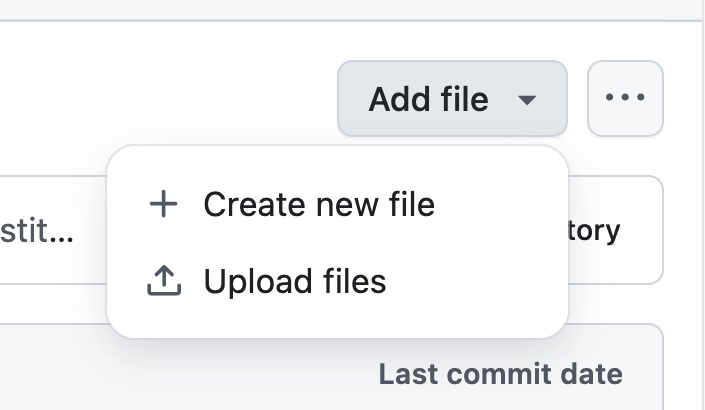
On the upper right-hand side of the page, click Add file, then select + Create new file.

Enter a name. Use your github user name with the .markdown extension, like this:

The contents of the file go where it says Enter file contents here. Copy and paste the following “block” of text into that text field; yes the colors look strange here, but that’s because some styles are being interpreted when they shouldn’t be, which affects the colors:
---
layout: default
title: Home
nav_order: 10
has_children: false
---

# Markdown Practice

Welcome to the **The AI Alliance**: **Markdown Practice**.

{: .highlight }
> Put something in a "highlighted" box with an optional label (not used in the example).

{: .tip }
> **TIP:** Use the search box at the top of this page to find specific content.

{: .important }
> **IMPORTANT:** The "boilerplate" text on this page mixes content you might want to use, as well as tips on writing Markdown. See also the comments in the source files. Make sure you search for and change all TODOs on all the pages!

{: .note }
> **NOTE:** Please join us! See our [contributing]({{site.baseurl}}/contributing) page for details.

{: .warning }
> **WARNING!** This is a warning!

A _generic_ quote:

> Shakespeare once wrote, "Heavy is the head that wears the crown."

Please join us! See our [contributing]({{site.baseurl}}/contributing) page for details.

This site is organized into the following sections [^1] (with an example footnote):

* [TODO - second top-level page]({{site.baseurl}}/second_page)
    * [alternative link](second_page)
* [TODO - nested]({{site.baseurl}}/nested/nested)
Note how relative links are written. For siblings (like the next set of bullets…) or subpages, you don’t have to use the {{site.baseurl}} prefix (like the alternative link), but use {{site.baseurl}} instead of relative navigation hacks like ../../foo/bar.
TIP:
site.baseurlis a variablebaseurlin the templating language liquid Jekyll uses. It is definedsite-wide indocs/_config.yml. Wrapping in double curly braces,{{site.baseurl}}, tells liquid to insert the definition of this variable inline in the generated HTML content for the page. This particular variable resolves to the root for the website. We rely on it because when you run the website on your local machine, this value will behttp://localhost:4000, but when the site is published, it will behttps://the-ai-alliance.github.io/REPO_NAME(whereREPO_NAMEisopen-trusted-data-initiativefor the OTDI site, for example). Hence, if you write a relative link[other](/other), it will render correctly on your local machine, but not when published!!
There are also page variables defined in the YAML block at the top of the Markdown files, as shown in the previous example:
---
layout: default
title: Home
nav_order: 10
has_children: false
---
For example, layout tells Jekyll to use the “default” layout file (which is resolved to docs/_layouts/default.html). You could reference this variable in the page content using {{page.layout}}.
More of the index.markdown content:
## Section Two

Additional links: [^2]

* [Contributing]({{site.baseurl}}/contributing): We welcome your contributions! Here's how you can contribute.
* [About Us]({{site.baseurl}}/about): More about the AI Alliance and this project.
* [The AI Alliance](https://www.aialliance.org){:target="aia"}: The AI Alliance website.
* [Project GitHub Repo](https://github.com/The-AI-Alliance/markdown-practice){:target="_blank"}

Note our convention that external URLs include a target, specified with `{:target="some_name"}`. Adding these targets means browsers will automatically open external links in a new tab. You will also notice that external links get a little box and arrow adornment. This is done automatically through a clever CSS hack in `docs/_includes/css/custom.scss.liquid`.

A table example using standard Markdown and showing how to set the desired alignment. (The extra whitespace in the source is only for easier readability.):

| Column 1 (Left Aligned) | Column 2 (Centered) | Column 3 (Numbers - Right Aligned) |
| :------- | :------------------: | -----: |
| text 1   | centered             | 1      |
| text 2   | also centered        | 20     |
| text 3   | and this is centered | 300    |

[^1]: Use `[^N]` (for increasing `N` values) to mark "footnote #N" in text, as shown above. This is an example footnote with a link to it from above, and a link at the end of the footnote to go back to the point in the text (the "curled" arrow). **WARNING**, you must include the colon in the footnote definition as shown here, `[^1]:`.
[^2]: A second example footnote. Note that you don't need to put a blank line between them; they work like lists.

<!--
Use the following construct anywhere in the page to automatically
show a table of contents for the sections on the page. This is
_different_ than a list of child pages (i.e., separate markdown files).
That list is always shown at the bottom automatically, as defined in
the default.html template file.
-->

<details open markdown="block">
  <summary>
    Table of contents
  </summary>
  {: .text-delta }
1. TOC
{:toc}
</details>
This is the default contents in the index.markdown page (at the time of this writing…). We’ll work through and edit this content next.
Save Your Work
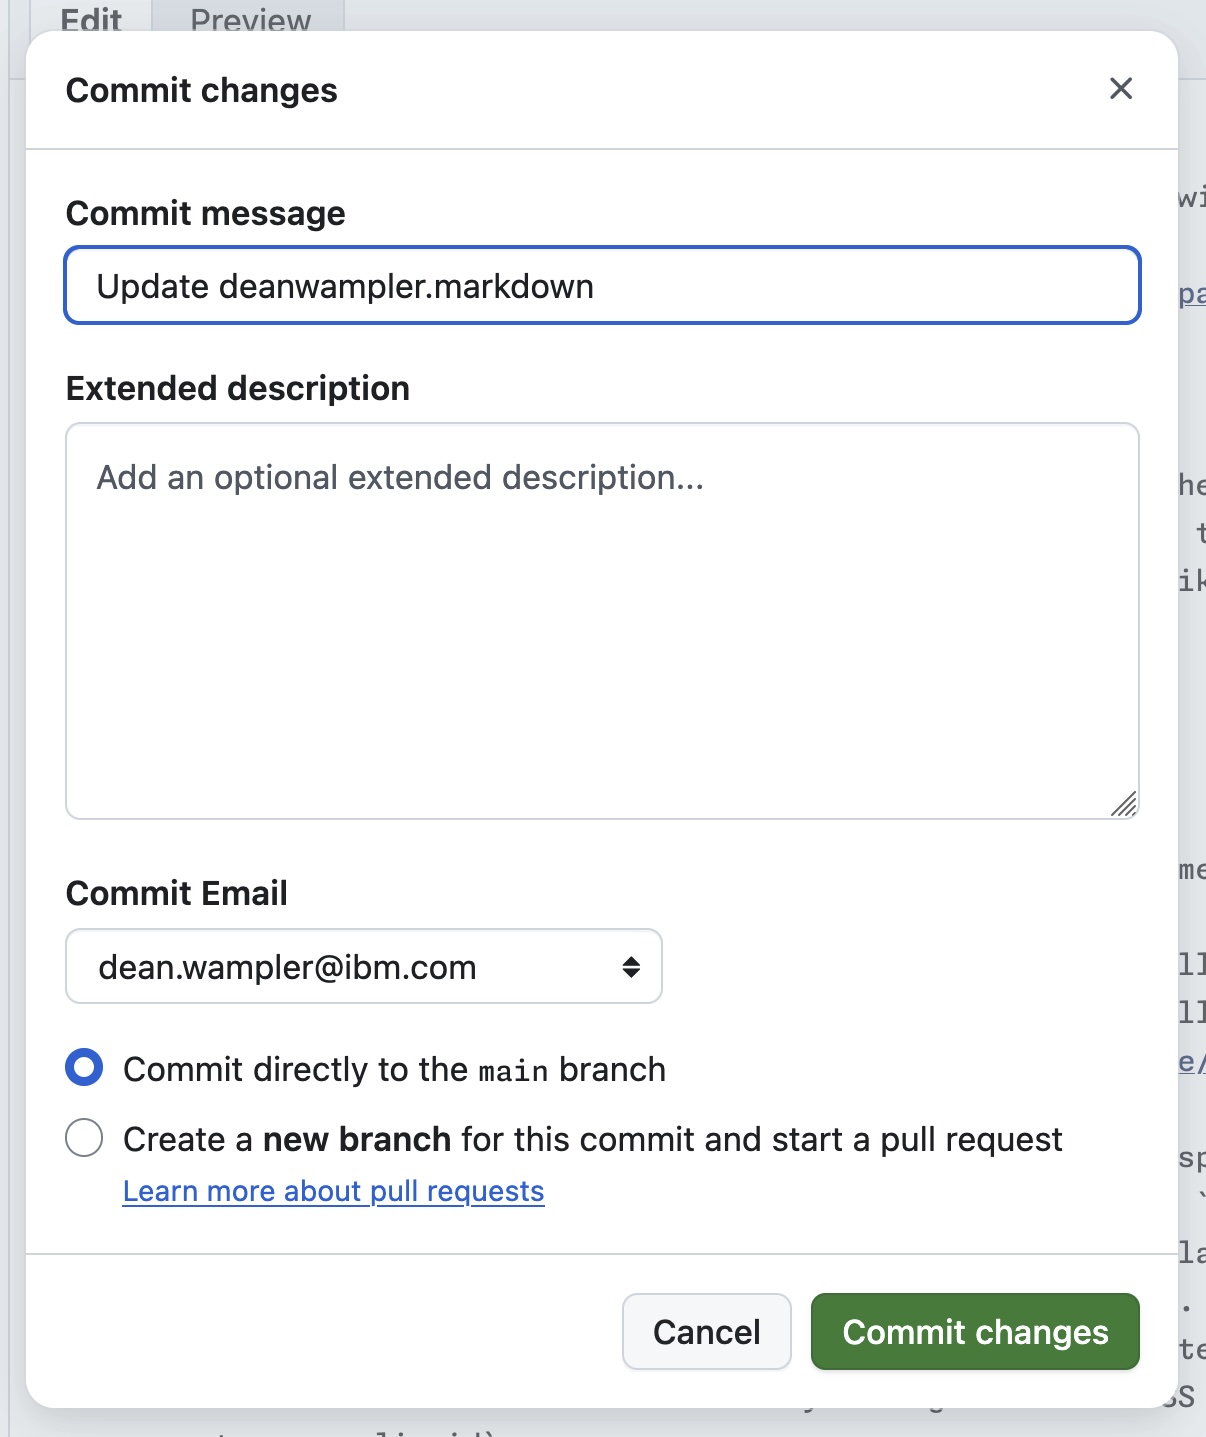
Any time you want to save your work, like for example, right now… click the green Commit changes… button.

Fill in the brief Commit message with a concise summary and add a more Extended description, which is optional but recommended for non-trivial changes. Leave the rest of the fields as is and click Commit changes.
Editing the Page Content
Start Editing Your Page
Click the pencil to edit the page again:

Now we’ll modify the content in the page.
The YAML Block
The YAML block at the top (between the --- lines) provides metadata so Jekyll (the engine that renders the site…) knows how and where to render the pages.
- We always use the
defaultlayout. - Change the
titleto something likeDean Wampler's Page, or anything unique-ish… - Change the
nav_orderto some number between 11 and 89, inclusive. - Leave
has_childrenset tofalse.
The <h1> Title
The # before Markdown Practice will be rendered as an <h1>Markdown Practice</h1> tag. Below, you’ll see ## Section Two, which will become <h2>Section Two</h2>, etc.
Change the title to the same value you used in the YAML block or anything else you want.
Markdown Tables
After the title is one form of a Markdown table, which also demonstrates other formatting techniques. Click the Preview button to see how it is rendered. Click Edit to go back to editing mode, etc.
Another table format, the more conventional kind, is shown below. See Column 1 (Left Aligned), around line 46.
Text Formatting
Note in the first table that bold font is used when you write **this a bold statement!**. similarly, italic font is used when you write _this is a notable phrase_. You can combine the two: notable and bold!, written _**notable and bold!**_ or also notable and bold!, written **_also notable and bold!_**
How is that typewriter format specified, e.g., for code snippets? You wrap the text in back ticks like this: `typewriter format`. This provides inline formatting. What about a block of source code or other monospace text? Use three back ticks on a line “```” before and after the text:
git clone git@github.com:The-AI-Alliance/my-site.git
cd my-site
```
The shell is optional; when the block is code from a particular programming language, you can specify a formatter after the first “```”, in this case the shell. You can also use python, json, markdown, …
Hyperlinks
Note how the hyperlinks are specified. Two useful examples are shown:
[Contributors]({{site.baseurl}}/contributing/#contributors)[Join Us](https://www.aialliance.org/join){:target="_blank"}
The basic format is [label](URL). For URLs that are internal links, like the first one shown, meaning links within the same site, use {{site.baseurl}}/path/relative/to/docs. We discussed why we use this idiom in a TIP above. As a reminder, don’t just use [Contributors](/contributing/#contributors) for paths relative to the website “root”, because this will work when you run locally, but not when the site is published!
The second link example goes to an external site and specifies a conventional https://... URL. Note the {:target="_blank"} at the end. This is a special feature of GitHub Pages that isn’t available in most other Markdown flavors.
It’s purpose is to render the hyperlink like this:
<a href="https://www.aialliance.org/join" target="_blank">Join Us</a>
You may already know that the target in an anchor (<a>) tag tells the browser to open the link in a new window or tab, named _blank in this case. The value can be anything, but it is a convention to use _blank, which some browsers will interpret as “use a unique tab every time” (but not Firefox, FYI!). Our convention is to add targets for all external links, but it doesn’t make sense for internal links. Unfortunately, this means adding the tedious {:target="_blank"} content to each and every external link. You should decide if you want this for your site. At least include or omit this directive consistently…
TIP: There is a script in each microsite’s root directory called
check-external-links.shthat can detect missingtargets. It can’t fix the links, but it will show you where they are. Run it with--helpfor details.
There is one other useful link format, e.g., save your work, written [save your work](#save-your-work).
The #save-your-work refers to an anchor on this same page. You could also link to an anchor on another page, e.g., https://example.com/#some-anchor. In our example, if you click the link, it should take you to the Save Your Work section on this page.
Now Try playing with either or both tables, change the text formatting, add or edit hyperlinks, etc. See your results by using the Preview tab.
Callouts or Quoting Text
Add the next line in the box to the page and then use the Preview to see how it is rendered:
> **Try This:** Use the search box at the top of this page to find specific content.
That’s a basic option for quoting text, a.k.a., callouts, supported by all(?) Markdown dialects. Note the leading >, which indicates the text is to be “quoted”.
Just the Docs has some nicer styles that can be used instead, in theory, but we ran into problems with GitHub Pages deployments, so we “fake” them as described next.
Here is what they look like:
Put something in a “highlighted” box with an optional label.
TIP: Use the search box at the top of this page to find specific content.
IMPORTANT: The “boilerplate” text on this page mixes content you might want to use, as well as tips on writing Markdown. See also the comments in the source files. Make sure you search for and change all TODOs on all the pages!
NOTE: Please join us! See our contributing page for details.
WARNING! This is a warning!
A generic quote:
Shakespeare once wrote, “Heavy is the head that wears the crown.”
(Really, they all look the same except for the background color…)
This is the markdown used, which I also had you paste into your page at the beginning of this tutorial. Note that > is required, with an optional “label”, like TIP: and they specify a CSS class, e.g., {: .tip }:
{: .attention }
> Put something in a "highlighted" box with an optional label (not used in the example).

{: .tip }
> **TIP:** Use the search box at the top of this page to find specific content.

{: .important }
> **IMPORTANT:** The "boilerplate" text on this page mixes content you might want to use, as well as tips on writing Markdown. See also the comments in the source files. Make sure you search for and change all TODOs on all the pages!

{: .note }
> **NOTE:** Please join us! See our [contributing]({{site.baseurl}}/contributing) page for details.

{: .warning }
> **WARNING!** This is a warning!

A _generic_ quote:

> Shakespeare once wrote, "Heavy is the head that wears the crown."
This is also another area where Markdown for GitHub READMEs differs from GitHub Pages. The former has an additional nice way to define callouts that use icons for warnings, notes, info, etc., which is somewhat mimicked by Just the Docs. See Quoting text.
Bullet and Numbered Lists
Just before and after ## Section Two on the page, you’ll see examples of bullet (unordered) lists, including how to nest them. The same techniques work for ordered (numbered) lists:
1. This is the first element in a numbered list.
   1. Here is a subelement "numbered" with the alphabet.
   1. A second subelement.
1. The second element...
- This is the first element in a numbered list.
- Here is a subelement “numbered” with the alphabet.
- A second subelement.
- The second element…
Note that we just used 1. for all entries and Jekyll handled incrementing the numbers… and using letters!
Save Your Work (Again)
Save your work as before.
Delete a File
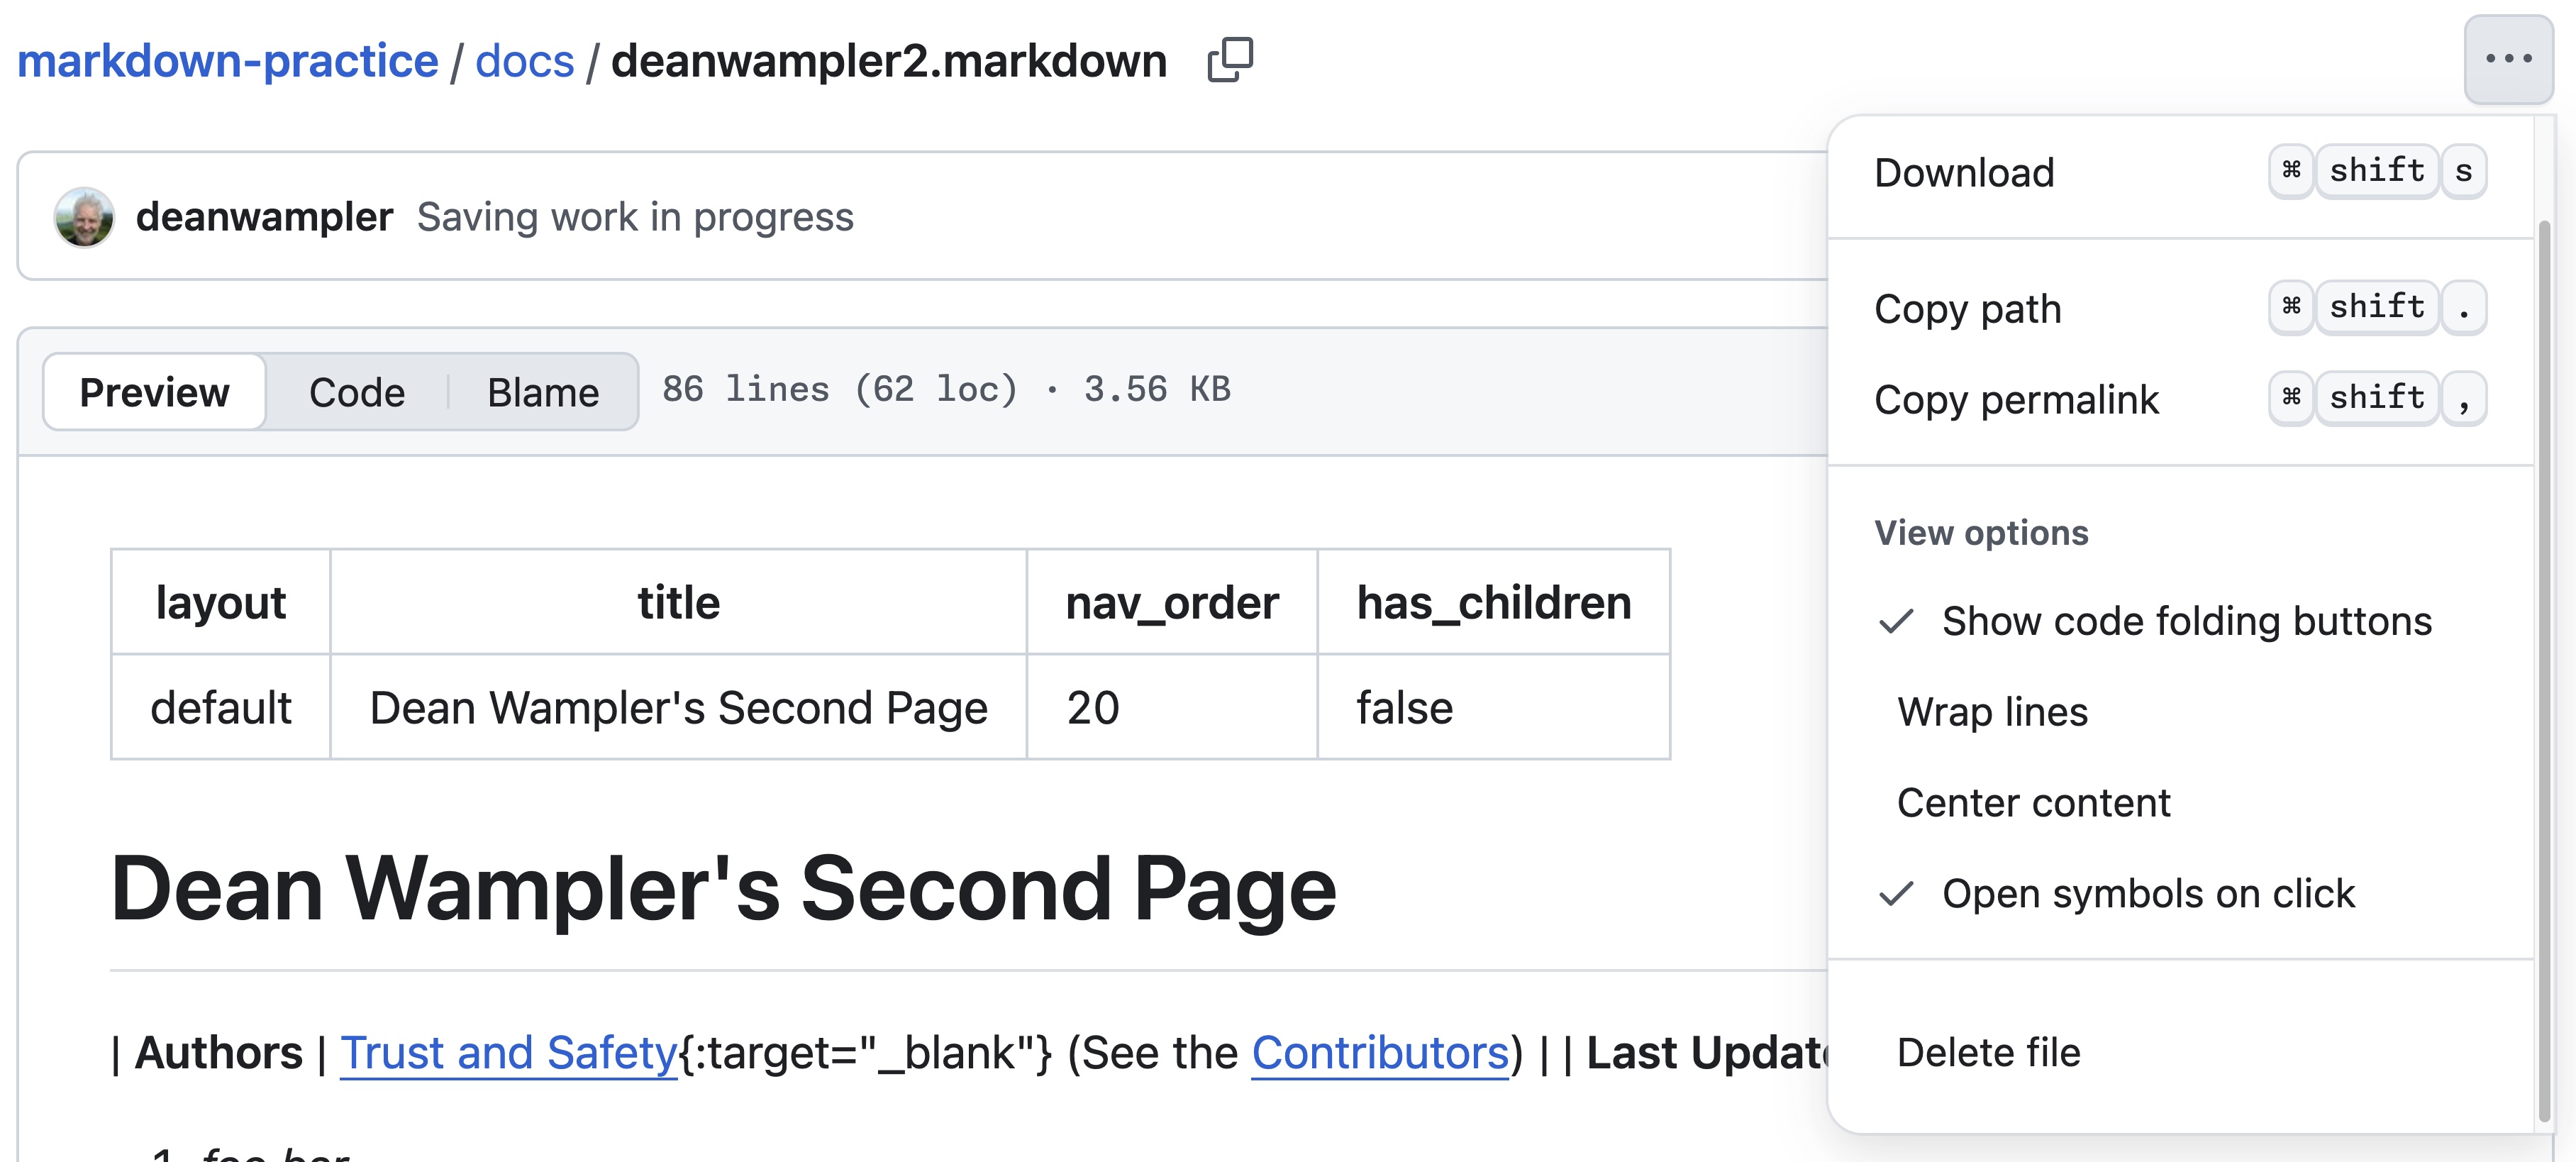
You can delete a file by browsing to it, then clicking the ... menu on the right-hand side:

You might need to scroll down to the bottom of the menu!
Homework…
Look at how footnotes and HTML comments are used.
See the <details open markdown="block">...</details> block at the bottom. this inserts a table of contents for this page only, not all pages at the bottom. Actually, it makes more sense to put this at the top for long pages, like I did for this cheat sheet. If the TOC is not useful, just delete this altogether. Try moving it to the top of your page. Is it useful??
More complex sites will need to nest content, e.g., like the Trust and Safety User Guide.
In this practice repo, see the nested folder, which provides an example of how to structure nested content and link to it from other pages.
Go through the GitHub Pages Markdown Guide linked above. Try adding Markdown content that we haven’t discussed here.
More TODO…
